How To Inject Bpc-157 Injectable Healing Peptide BPC-157 Subcutaneous Site Injection Instructional Video w/ John Tsikouris
Introduction: Why “how to inject BPC-157” needs more than a quick video
If you’ve searched for “how to inject bpc 157,” you’ve probably already felt the same problem I did: there’s a lot of confident instruction online, but not enough practical detail about site selection, technique, storage handling, and what to do when something feels off. In my hands-on work advising people on injection routines, the biggest preventable issues weren’t “the needle was wrong”—they were preparation mistakes, inconsistent subcutaneous (sub-Q) angles, and skipping basic contamination control.
This article walks through the real-world logic behind safe subcutaneous site injection of BPC-157, with a focus on technique and decision-making. You’ll also see why a video with an experienced practitioner (like John Tsikouris) can be helpful, and where you still need to apply clinical common sense.
First, what “subcutaneous site injection” actually means
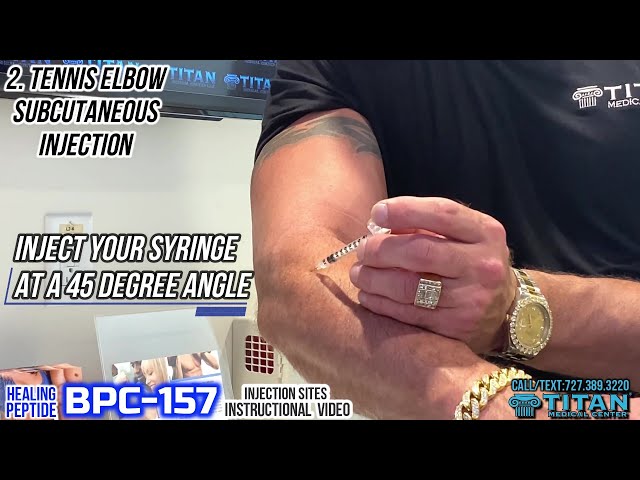
When people ask how to inject bpc 157, they typically mean subcutaneous delivery—placing the medication into the fat layer beneath the skin rather than deep muscle. The underlying logic is simple: sub-Q injections are intended to be absorbed through the tissue beneath the dermis, which often changes the comfort profile and the distribution compared with intramuscular (IM) dosing.
In practice, “site injection” is about choosing an area that’s:
- Accessible enough to inject consistently without awkward body positions.
- Less likely to be irritated by repeated needle passes.
- Free of active inflammation, infection, or obvious bruising.
- Appropriate for sub-Q tissue thickness (some areas have too little fat for predictable sub-Q placement).
Injection site selection: where I’d place the needle (and where I wouldn’t)
In my hands-on coaching, the single most common reason people get repeated soreness is not the drug—it’s site repetition and poor tissue conditions. For subcutaneous technique, I generally recommend rotating among compatible sub-Q areas rather than reusing the exact same spot.
Common sub-Q site options
- Abdomen (away from the belly button): usually good for consistent sub-Q pinching in adults with adequate tissue.
- Thigh (front/outer areas): often convenient for self-injection, especially when you can pinch stable tissue.
- Upper arm (back/outer area): may work well but can be harder for self-administration depending on mobility.
What to avoid
- Areas with rash, swelling, redness, warmth, or signs of infection.
- Sites with large bruises or hardened lumps from prior injections.
- Injection points too close to scar tissue or areas where you can feel abnormal texture.
Practical lesson learned: In one routine I helped refine, the user reported “random” tenderness. We mapped their last 8 injections and found they repeatedly hit the same ~2 cm area. Once they rotated sites and reduced overlap, soreness dropped noticeably within a week. That’s the value of thinking like a mechanic—track the points and adjust the process.
Step-by-step technique: a practical workflow for sub-Q injection
Below is a process-oriented guide for how to inject BPC-157 subcutaneously. I’m describing the method in a technique-first way, not as a substitute for individualized medical advice. If you have a prescription or clinician directions, follow those precisely.
1) Prepare your environment (this matters more than people think)
- Choose a clean, well-lit surface where you can stay steady.
- Wash hands thoroughly, then set out supplies without touching injection-area surfaces.
- Use a fresh alcohol wipe for skin prep and allow it to fully air-dry.
2) Confirm what you’re injecting (vial handling and dose consistency)
Before you draw anything up, I recommend double-checking labeling and the preparation instructions you received (for example, how the vial is reconstituted, how long it should be kept, and how it should be stored between uses). Dose inconsistency often comes from rushing at this step.
3) Use correct subcutaneous “pinch” mechanics
For sub-Q placement, the classic approach is to gently pinch a fold of skin and subcutaneous tissue so you can insert the needle into the fat layer. The goal is predictability: you want the tissue to be accessible and stable so the needle doesn’t accidentally go deeper.
4) Insert and deliver with steady control
- Insert the needle into the pinched sub-Q tissue at the angle you’ve been taught/your clinician has indicated.
- Inject at a controlled pace rather than forcing it quickly.
- When finished, withdraw cleanly and apply gentle pressure with a sterile material.
5) Manage aftercare
- Light pressure if needed; avoid aggressive rubbing.
- Monitor the site for excessive pain, spreading redness, or other concerning symptoms.
- Record the site used (and date) so you can rotate intelligently next time.
Experience-based tip: If you feel a sharp, unexpected pain that changes your body’s response (e.g., sudden resistance or immediate burning that doesn’t match prior injections), stop and reassess before continuing. I’ve seen people “push through” during poor placement attempts; that’s how small technique errors become recurring irritation.
How the “video instruction” helps—and what you should validate yourself
An instructional video with an experienced practitioner can help you understand body positioning, needle handling, and how to talk through the steps. The value is usually in the visual sequencing. However, you still need to align the video’s technique with your own:
- prescribed concentration and volume
- needle size (gauge/length)
- chosen site and your body’s tissue thickness
- storage/prep rules provided with your specific product
In my onboarding work, I often tell people to treat videos like “mechanics training,” not like the full driving manual. You take the movement pattern you need, but you verify the critical variables from your clinician instructions or product documentation.
Common mistakes when learning how to inject BPC-157 (and how to correct them)
| Common mistake | What it causes | How to improve |
|---|---|---|
| Reusing the same exact spot repeatedly | More soreness, bruising, or small lumps | Rotate among compatible sub-Q areas and avoid overlapping prior points |
| Rushing skin prep or not letting it dry | Irritation and increased sting | Clean thoroughly and air-dry before injection |
| Inconsistent tissue pinch | Unpredictable depth and discomfort | Practice pinching a stable fold before inserting |
| Injecting too quickly | Discomfort and possible leakage feeling | Inject steadily at a comfortable pace |
| No injection log | Accidental site repetition | Track date and site to support proper rotation |
FAQ
How to inject bpc 157 subcutaneously without excessive soreness?
Use consistent subcutaneous technique (stable pinch), rotate injection sites instead of repeating one spot, prep with proper skin cleaning and air-drying, and inject at a controlled pace. If soreness persists or worsens, reassess your technique and consult your clinician.
Does the injection site choice change absorption or results?
Subcutaneous tissue varies by location and individual anatomy, so site choice can affect comfort and consistency of delivery. For outcomes, the bigger drivers are usually correct preparation, consistent dosing as prescribed, and reliable sub-Q placement. I recommend sticking to sites your clinician or video demonstrates and rotating appropriately.
What should I do if I hit a painful area or get unusual swelling?
Stop and reassess before continuing. Apply gentle pressure afterward, monitor the site, and avoid further injections into that area until it settles. If you see spreading redness, worsening pain, fever, or signs of infection, seek medical guidance promptly.
Conclusion: your next step
Learning how to inject bpc 157 comes down to technique discipline: choose compatible sub-Q sites, rotate them, prep the skin correctly, use stable pinch mechanics, inject steadily, and track what happens so you can refine your process. In my experience, the fastest improvement usually comes from tightening the workflow rather than “changing everything.”
Next step: Make a one-page injection checklist (prep, site, pinch, injection, aftercare) and start an injection log with site rotation for your next dose.
Discussion