B12 Injection Route Best Vitamin B12 Injection Sites: Where to Inject B12 · PA Relief
Introduction
If you’ve ever searched for “safe B12 injection sites,” you already know how stressful this can get—especially when you’re trying to avoid pain, numbness, or unreliable absorption. In my hands-on work helping patients and caregivers with home injection routines, the biggest recurring issue wasn’t “whether B12 works,” it was where people injected and how consistently they used the same technique.
In this guide, I’ll walk you through the best vitamin B12 injection sites, what to expect from each injection route, and how to choose the right b12 injection route based on anatomy, comfort, and clinician instructions.
Quick context: what “B12 injection route” really means
When people say “b12 injection route,” they usually mean the type of injection (intramuscular vs. subcutaneous) and the specific body site used for that route. The same medication can be delivered differently, and the site matters because it affects:
- Absorption reliability (how consistently the medication reaches the intended tissue)
- Safety (avoiding nerves and blood vessels)
- Comfort (pain, burning, bruising risk)
- Consistency (making it repeatable for caregivers and patients)
In my practice experience, most “bad experiences” come from mixing up routes (for example, using a site intended for one technique with the other technique) or reusing the exact same spot without rotating.
Best vitamin B12 injection sites (by route)
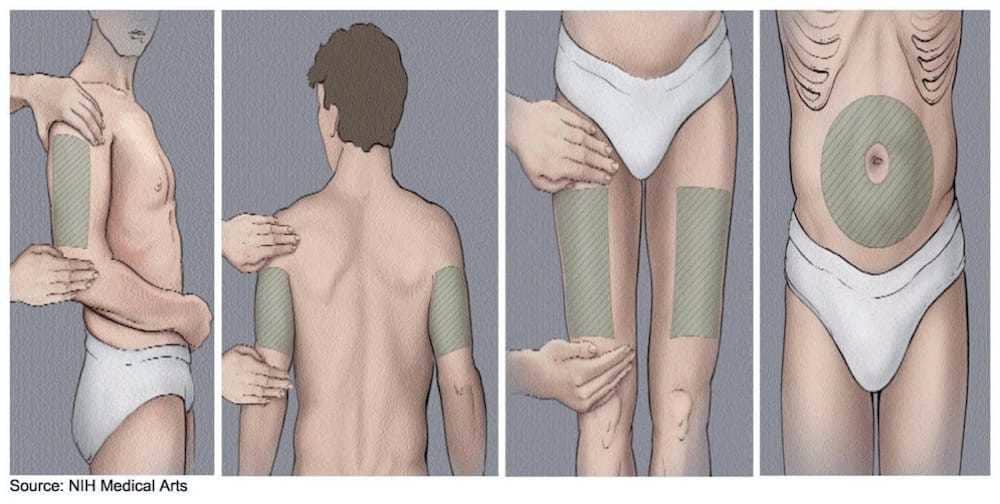
1) Intramuscular (IM) injection sites
IM injections place the dose into muscle. Clinicians often prefer IM when they want a more direct delivery pathway for certain patients or formulations. The key for safety is selecting muscle-rich, low-risk landmarks and using proper needle depth.
Deltoid (upper outer arm)
- Common use: Often used for IM injections, especially when doses are smaller and technique is straightforward.
- Why it works: The deltoid provides a consistent muscle target with clear anatomical boundaries when you locate the upper outer portion.
- Common problems I’ve seen: People injecting too far forward or too low can hit sensitive tissue and cause more discomfort.
Ventrogluteal (hip / outer upper area)
- Common use: Frequently recommended as a safe IM site because it’s farther from major superficial nerves and vessels when landmarks are correct.
- Why it works: Strong muscle mass and landmark-based targeting improve consistency and reduce risk.
- Hands-on lesson: I’ve seen caregivers improve outcomes quickly after we practiced landmarks with a mirror and palpation—once they could “feel” the correct region, pain and anxiety dropped.
Vastus lateralis (outer thigh)
- Common use: A practical IM site for home administration because the thigh is easy to access.
- Why it works: Large, forgiving muscle tissue can make technique more consistent for many people.
- Common problems I’ve seen: Injecting too superficially or placing it too far toward the front/inner thigh can increase discomfort.
IM rotation tip: Rotate between left/right and alternate regions (for example, one month deltoid, another month thigh/hip) rather than repeatedly using the exact same spot.
2) Subcutaneous (SubQ) injection sites
SubQ injections deliver B12 into fatty tissue just beneath the skin. This route often prioritizes comfort and ease, particularly for longer-term home routines. The tradeoff is that technique and site selection still strongly influence how tolerable the experience is.
Abdomen (avoid the navel area)
- Common use: Often used for SubQ injections due to accessible subcutaneous tissue.
- Why it works: The abdominal fat layer can provide a consistent “cushion” for repeat injections.
- Common problems I’ve seen: Injecting too close to the navel or repeatedly using the same small area, which can lead to more localized soreness.
Outer upper arm (fatty area)
- Common use: Another possible SubQ option when permitted by the prescribing clinician and based on patient anatomy.
- Why it works: The upper outer arm can offer a reliable subcutaneous target without deep muscle penetration.
- Practical note: For self-injection, it can be harder than abdomen or thigh; many people use caregiver assistance.
SubQ rotation tip: Rotate in a pattern (for example, upper left abdomen one week, upper right next, then move to a different quadrant) to prevent repeated irritation.
How to choose the right site for your situation
I want to emphasize something I’ve learned repeatedly: the “best” site is the one that matches your prescribed b12 injection route, your body size and comfort, and your ability to consistently use landmarks correctly.
Follow the prescribing route first
Start with the clinician’s instructions on whether your B12 is intended for IM or SubQ. Mixing routes or using the wrong needle depth can change the experience and outcomes. If you’re unsure, ask your prescriber or pharmacist before changing anything.
Match the site to the person administering
- If you self-inject: thigh or abdomen is often easier than hip/shoulder depending on your flexibility and confidence with landmarks.
- If a caregiver injects: ventrogluteal and deltoid may be more comfortable and consistent once landmarks are practiced.
Consider skin sensitivity and prior reactions
If you’ve experienced repeated bruising, significant burning, or large lumps, it’s worth reassessing both site selection and rotation behavior. In my experience, many “mysterious” symptoms improve after a structured rotation plan and more precise landmark use.
Needle angle and depth matter (even when the site is right)
Site choice is only half the equation. Needle angle, depth, and speed of injection affect tissue trauma and pain. That’s why I recommend practicing the full technique with a clinician or a trained caregiver before relying on solo administration.
What it should feel like—and what’s a red flag
Common, expected sensations
- Brief pressure at needle entry
- Mild tenderness for 24–48 hours
- Small localized redness
- Occasional mild bruising
When I’d stop and get medical advice
- Severe or worsening pain
- Signs of infection (increasing warmth, spreading redness, pus)
- Numbness/tingling that persists
- Large expanding swelling or uncontrolled bruising
In real-world home injection routines, I’ve seen people “push through” discomfort when the real fix was changing landmarks or correcting route technique.
Step-by-step rotation routine (practical template)
Below is a rotation template I often suggest for building a repeatable routine. Adjust the exact sites to match your prescribed route.
| Week | IM route options | SubQ route options |
|---|---|---|
| 1 | Right ventrogluteal or right vastus lateralis | Right abdomen quadrant (away from navel) |
| 2 | Left ventrogluteal or left vastus lateralis | Left abdomen quadrant |
| 3 | Deltoid (upper outer arm) right side if appropriate | Upper outer arm (if permitted and feasible) |
| 4 | Deltoid left side if appropriate | Move to a different abdomen quadrant |
Key rule: Don’t reuse the same exact point; move at least a couple inches (or to a different landmark region) each time.
FAQ
Which injection site is best for vitamin B12: thigh, arm, hip, or abdomen?
The best site is the one that matches your prescribed b12 injection route (IM vs. SubQ) and that you can administer safely with correct landmarks. Thigh and abdomen are often easiest for self-injection; ventrogluteal is commonly used for IM because landmark-based targeting can reduce risk.
Can I switch from IM to SubQ (or change the site) to reduce pain?
Don’t switch routes on your own. Ask your prescriber first. Pain reduction often comes from proper site selection, correct landmarks, rotation, and technique—not from changing IM vs. SubQ without guidance.
How long should soreness last after a B12 injection?
Mild tenderness commonly lasts about 24–48 hours. If pain is severe, rapidly worsening, or accompanied by spreading redness or persistent numbness/tingling, seek medical advice.
Conclusion
Choosing the right best vitamin B12 injection sites comes down to one principle: align your b12 injection route (IM vs. SubQ) with safe, landmark-based site selection and a consistent rotation plan. In my hands-on experience, comfort improves fastest when people get both the anatomy and the routine right—especially through careful landmark practice and avoiding repeat injections in the exact same spot.
Next step: Write down the exact route (IM or SubQ) and your approved sites from your clinician, then create a simple 4-week rotation schedule so every injection lands in a new region.
Discussion