B12 Administration Injection How to Give B12 Injections at Home to Yourself · PA Relief
If you’ve ever needed a b12 administration injection but felt stuck waiting for a clinic visit, you’re not alone. In my hands-on work with patients managing B12 deficiency, the biggest barrier wasn’t the technique—it was confidence: knowing the right site, the right needle depth, how to avoid bruising, and what “good” looks like afterward. This guide walks you through giving yourself B12 injections at home to reduce friction while staying consistent and safe.
Below, I’ll cover what to prepare, injection sites, step-by-step technique, post-injection care, and common troubleshooting. I’ll also flag when you should pause and contact a clinician—because home administration should be empowering, not risky.
Before You Start: Confirm Safety, Order, and Prescription Details
Home injection can be appropriate for many people, but I always start by confirming the essentials. In real-world settings, I’ve seen dosing errors happen when the prescription, concentration, and syringe type weren’t double-checked.
- Confirm your prescription: drug name (commonly cyanocobalamin or hydroxocobalamin), dose (e.g., mg/mL), and frequency.
- Check the formulation: some B12 products are for intramuscular (IM) use, others may be subcutaneous (SC) depending on your prescriber’s instructions.
- Verify the route your clinician prescribed: your injection technique and needle choice depend on IM vs SC administration.
- Use only supplies provided or approved: sterile needles/syringes, alcohol swabs, gauze, and a sharps container.
- Plan your workspace: clean surface, good lighting, and a place to store your sharps container at arm’s reach.
If you’ve never been taught the technique, ask your prescriber or nurse for an in-person or video demonstration. Even an excellent written guide can’t replace initial hands-on instruction.
Understanding Injection Sites for B12 Administration Injection
The injection site matters because it affects comfort, accuracy, and consistency. For self-administration, patients commonly use sites that are easier to reach while maintaining correct technique.
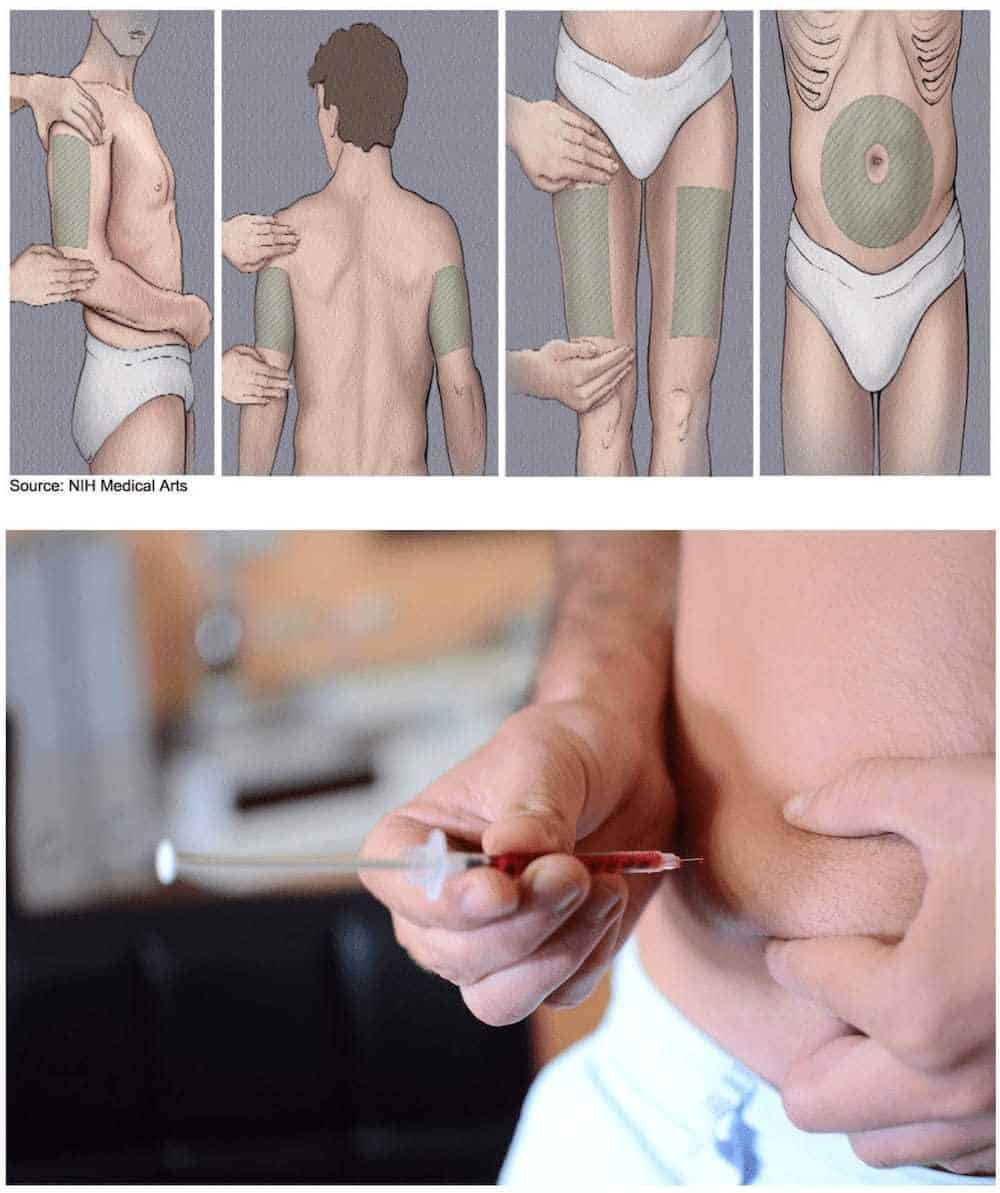
Common intramuscular (IM) sites
- Deltoid (upper arm): sometimes used for IM injections, but many clinicians prefer other sites for self-injection comfort and reliable muscle access.
- Ventrogluteal (hip area): often considered a strong IM option when taught correctly; excellent muscle selection if you can identify landmarks safely.
- Thigh (vastus lateralis): frequently used by self-injecting patients because it’s accessible and provides a stable muscle target.
Common subcutaneous (SC) sites
- Abdomen (at least a couple inches away from the navel): many people find this site easy for SC injections.
- Thigh (for SC): another accessible option depending on your prescribed route and your body habitus.
- Upper outer arm (if accessible): depends on your comfort and technique.
Lesson learned from practice: I’ve seen self-injectors reduce discomfort when they consistently rotate sites and inject into the “right” tissue plane for the prescribed route. If your instructions say IM, don’t treat it like SC—aiming too superficially can cause poor absorption or increased local irritation.
What You Need (A Checklist for Home B12 Injections)
| Item | Why it matters |
|---|---|
| Sterile syringe/needle (per prescription) | Correct needle size supports safe depth and reduces trauma |
| B12 vial/ampule | Use the exact medication, strength, and expiration |
| Alcohol swabs | Helps sanitize the skin before injection |
| Gauze or cotton | For brief pressure if needed |
| Adhesive bandage (optional) | For minor bleeding or if you prefer covering the area |
| Sharps container | Safe disposal of needles and syringes |
| Gloves (optional) | Can improve comfort if you prefer extra hygiene |
Keep everything within reach before you start. Trying to hunt for supplies mid-procedure is a common cause of contamination and missed steps.
Step-by-Step: How to Give Yourself a B12 Administration Injection
The exact mechanics vary by IM vs SC and by whether you’re using a vial or prefilled form. Use this as a framework, and follow your clinician’s specific instructions for your product and route.
1) Prepare your supplies and sanitize
- Wash your hands thoroughly.
- Set up supplies on a clean surface.
- Check medication label, dose, and expiration date.
2) Clean the injection site
- Wipe the chosen site with an alcohol swab.
- Let the area air-dry—don’t blow on it.
3) Load the syringe (if using a vial)
- If your medication comes in a vial, draw up the prescribed volume using sterile technique.
- Remove air bubbles if your clinician has instructed you to do so (technique varies by product and syringe type).
4) Position yourself for control
In my experience, positioning is the difference between “I can do this” and “I’m tense and it’s harder than it should be.” Choose a spot where you can see the site and keep your arm/leg stable.
- Deltoid (if instructed for your route): sit upright; relax the shoulder.
- Thigh: sit or stand so you can comfortably access the outer-middle portion of the thigh.
- Abdomen (for SC): use a relaxed posture; avoid areas with tenderness or bruising.
5) Inject using the correct technique for the route
Important: Use the route you were prescribed. Depth and angle differ.
- If IM is prescribed: insert the needle into the muscle at the angle your training recommended; keep the motion smooth and controlled.
- If SC is prescribed: pinch a fold of skin and inject into the subcutaneous tissue at the angle your clinician taught.
6) Deliver the medication steadily
- Depress the plunger at a steady pace.
- Avoid forcing if you meet unexpected resistance—stop and reassess rather than pushing.
7) Withdraw and apply gentle pressure
- Withdraw the needle in one smooth motion.
- Press gently with gauze if there’s minor bleeding.
- Apply a bandage if needed.
8) Dispose and document
- Place the needle and syringe immediately into your sharps container.
- Record the date, site used, dose, and any issues (e.g., significant bruising, discomfort).
Common Problems (and How I’ve Seen People Fix Them)
Bruising or tenderness
Bruising is often a mechanical issue: rotating sites, choosing a slightly different position, and using consistent needle technique usually help. In practice, I’ve found that people who pause to re-check landmarks and relax their body inject with less tissue trauma.
- Rotate injection sites each dose.
- Avoid injecting through irritated or visibly bruised areas.
- Use a stable limb position to prevent sudden tensing.
Lump at the injection site (more common with SC)
Some localized lumps can occur due to tissue reaction or how the medication disperses under the skin. If you notice lumps that grow, become increasingly painful, or persist beyond expected timeframes, contact your clinician.
- Use the prescribed route and depth.
- Follow site rotation.
- Avoid massaging unless your clinician recommends it.
Worries about “did I inject correctly?”
If you’re unsure you used the right depth/route, don’t guess the next dose. I recommend calling your prescriber’s office or nurse line for confirmation before repeating or changing anything.
When Not to Self-Inject and Get Help Instead
- Severe pain during injection that doesn’t settle afterward
- Signs of infection: worsening redness, heat, pus, fever
- Allergic reaction symptoms: hives, swelling, trouble breathing
- Unclear prescription details (route, dose, or vial strength)
- Repeated problematic bruising or tissue reactions at multiple sites
If you experience a complication, your clinician may want to review technique and/or adjust needle size, route, or injection site strategy.
FAQ
What is the difference between IM and SC for b12 administration injection?
IM (intramuscular) places the medication into muscle tissue, while SC (subcutaneous) places it into the fatty tissue under the skin. The prescribed route determines injection angle, depth, and site selection—so you should follow your clinician’s instructions for your specific B12 product.
Can I switch injection sites every time?
Yes—site rotation is often recommended to reduce soreness and bruising. Use the same overall site category that matches your prescribed technique (IM vs SC), and avoid areas that are tender, infected, or already bruised.
How should I dispose of needles and syringes after a B12 injection?
Dispose of them immediately in an approved sharps container. Never put used needles in regular trash. If you don’t have a container yet, get one before starting your injection schedule.
Conclusion: Your Next Practical Step
Giving yourself a b12 administration injection at home comes down to three things I’ve seen repeatedly work: confirm the correct route for your specific prescription, inject into the right site with consistent technique, and reduce tissue trauma by rotating sites and keeping your process organized. When you do that, the “hard part” becomes routine.
Next step: Before your next scheduled dose, write down your route (IM vs SC), dose, injection site plan, and supplies checklist—and practice setup with your eyes on the landmarks (without injecting) so you feel calm and in control when it’s time.
Discussion