How Are B12 Injections Given Best Vitamin B12 Injection Sites: Where to Inject B12 · PA Relief
Introduction
If you’ve ever been told you need Vitamin B12 injections, you might also wonder, “How are B12 injections given—and where do they actually go?” In my hands-on work helping patients prepare for injections, the biggest anxiety isn’t the needle itself; it’s choosing the correct injection site, understanding what’s “normal” after an injection, and knowing when to call a clinician.
This guide explains the most common B12 injection sites, the practical steps behind safe administration, and how to reduce bruising, pain, and injection-day uncertainty—especially for people managing symptoms related to PA (pernicious anemia) relief.
Why Injection Site Matters for B12
When clinicians give B12 by injection, the goal is to deliver it into tissue where it can be absorbed reliably and comfortably. In practice, this usually means intramuscular (IM) injections (into muscle) or sometimes subcutaneous (SC) injections (into fatty tissue), depending on the prescription and patient factors.
From a real-world standpoint, the injection site affects:
- Comfort: Some muscles and areas are easier to access or less sensitive.
- Absorption consistency: IM vs SC route can change how the medication behaves in the body.
- Risk of local irritation: Repeated injections in the same spot can lead to soreness and bruising.
- Safety: Correct landmarking reduces the chance of hitting superficial nerves or blood vessels.
In my experience, patients do best when they follow the route written on their prescription and rotate sites as advised—because site consistency is helpful, but site repetition is not.
Common Vitamin B12 Injection Sites (Where to Inject)
Below are the most frequently used injection sites. Which one you use depends on your prescribed route (IM vs SC) and clinician instructions.
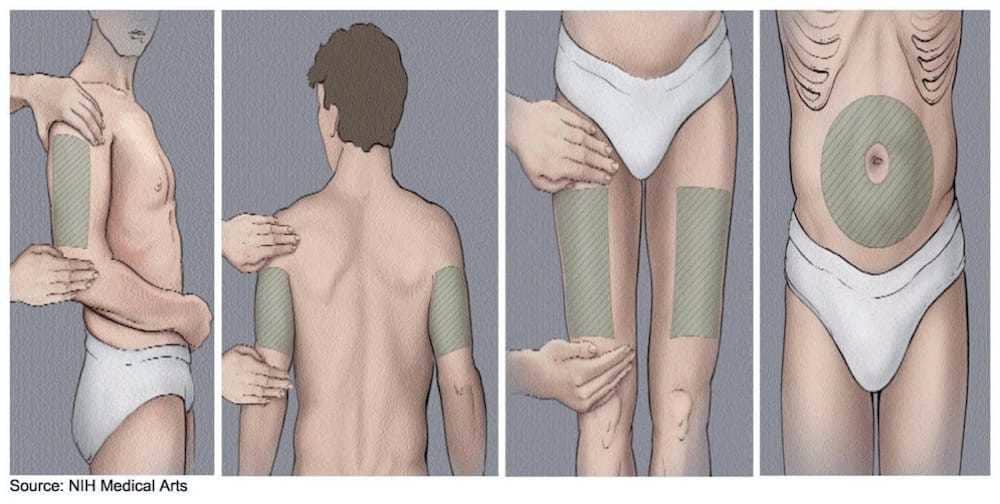
1) Deltoid (Upper Arm) — Common for SC or Certain IM Protocols
The deltoid is the upper outer arm area. It’s often selected when the medication is administered as subcutaneous or when a clinician determines it’s appropriate for IM with sufficient muscle.
- Best for: Patients comfortable self-injecting (or with caregiver support) once landmarks are taught.
- Practical tip: Use consistent landmarking (upper outer arm) and avoid injecting too close to the shoulder joint.
- Limitation: Not always ideal for IM if the muscle mass is limited or if your prescription specifies a different site.
2) Vastus Lateralis (Outer Thigh) — Reliable for Self-Administration
The outer thigh (vastus lateralis) is a go-to site in many self-injection training settings. It tends to be accessible and provides a straightforward area for proper technique.
- Best for: People who want an accessible site with easy positioning.
- Why it works: The muscle is usually well-defined and can reduce the “did I get it in?” uncertainty.
- Limitation: If you’re injecting IM, ensure you’re using the right needle length and depth for your body type—this is not a one-size-fits-all situation.
3) Ventrogluteal (Front-Side Hip) — Often Considered a Safer IM Site
The ventrogluteal region is located in the front/side hip area using specific anatomical landmarks. In clinical practice, it’s frequently recommended as an IM site because it’s relatively away from major superficial nerves.
- Best for: Many IM protocols, especially under clinician guidance.
- Why it matters: Landmark-based site selection helps with safety and reduces tissue sensitivity.
- Limitation: It can be harder for independent self-injection the first few times—caregiver or clinician training is often helpful.
4) Dorsogluteal (Upper Outer Buttock) — Used Historically, but Landmarking Is Critical
The upper outer buttock is another traditional IM location. However, in self-injection contexts, the key issue is correct landmarks and avoiding nerve structures.
- Best for: When a clinician specifically teaches the landmarks and confirms it’s appropriate for you.
- Limitation: Because landmarking mistakes matter, this site is often less favored for beginners.
How B12 Injections Are Given (Step-by-Step)
People search for “how are b12 injections given” for a reason: technique reduces pain and helps avoid complications. Below is a practical overview of what the process typically looks like in supervised training. Always follow your prescription and the instructions provided by your clinician.
Step 1: Confirm Route, Dose, and Supplies
- Confirm whether your prescription is IM or SC.
- Use the correct needle type/size prescribed (needle length and gauge can differ by route and patient anatomy).
- Prepare alcohol swabs, gauze, and a sharps disposal container.
Step 2: Choose the Injection Site and Rotate
- Use the site you were trained and prescribed to use.
- Rotate sites to avoid repeatedly injecting into the same exact spot.
- If a site is still tender, consider a different area (per clinician guidance).
Step 3: Clean the Skin and Let It Dry
Wipe the skin with an alcohol swab and allow it to dry. In my experience, rushing this step increases discomfort and can contribute to irritation.
Step 4: Administer the Injection Using Correct Angle/Depth
The angle and depth depend on the route (IM vs SC) and needle length. This is why clinician training matters: technique isn’t just “where”—it’s how you enter the tissue.
- For IM: the goal is correct placement into muscle.
- For SC: the goal is placement into fatty tissue without going too deep.
Step 5: Inject Slowly, Then Dispose Safely
Injecting slowly can reduce pressure discomfort. After injection, dispose of the needle immediately in a sharps container.
Step 6: What’s Normal After an Injection
- Minor soreness or redness for a short time
- Small bruising at the site
- Mild localized discomfort
What isn’t ideal is escalating pain, spreading redness, fever, or worsening symptoms—those are signals to contact a clinician.
PA Relief and B12 Injections: What Patients Often Notice
For people managing PA (pernicious anemia), B12 injections are commonly used to correct deficiency and support improvement in red blood cell production and nervous system function. In practical terms, patients often report symptom changes over weeks rather than hours.
In my hands-on conversations, I’ve seen two patterns that help set expectations:
- Early days: Many feel little immediate change; the focus is consistency with the injection schedule.
- Over time: Energy, nerve-related symptoms, or lab markers can improve gradually—especially when dosing and follow-up labs are done as prescribed.
Consistency with injection administration (site selection, technique, and schedule) supports smoother experiences—and reduces the “I might have done it wrong” stress that can derail adherence.
Tips to Reduce Pain, Bruising, and Injection-Day Anxiety
- Warm the solution if instructed: Some formulations can be made more comfortable at room temperature (follow your specific product guidance).
- Use the same trained site: Switching sites can introduce technique uncertainty. Rotate, but within your approved options.
- Don’t “hunt”: Enter confidently using the trained landmark and depth rather than repeatedly adjusting.
- Rotate systematically: Keep a simple log of injection dates and sites to avoid repetition.
- Ask for a technique check: One observation visit can correct angle/depth issues that cause the most discomfort.
Quick Comparison: Injection Site Pros and Cons
| Injection site | Common route fit | Strengths | Main limitations |
|---|---|---|---|
| Deltoid (upper arm) | Often SC; sometimes IM depending on prescription | Accessible once landmarks are learned | May not be ideal for IM if muscle access is limited |
| Vastus lateralis (outer thigh) | Often IM; can be used for SC depending on training | Easy positioning; typically straightforward for self-injection | Need correct depth/needle size for IM |
| Ventrogluteal (front-side hip) | Often IM | Landmark-based safety focus; commonly favored in IM training | May be harder to self-inject at first |
| Dorsogluteal (upper outer buttock) | Often IM (with strict landmarking) | Traditional site | Landmarks must be correct; less ideal for beginners |
FAQ
How are B12 injections given at home?
They’re given by using the route written on your prescription (IM or SC), cleaning the skin, using the correct injection site landmarks, and inserting at the correct angle/depth. In practice, most people start with clinician or nurse training to confirm needle size, technique, and the correct site for their body and medication.
Which B12 injection site is best for self-injection?
In many training scenarios, the outer thigh (vastus lateralis) is the most accessible for self-injection. However, the best site for you depends on whether your injection is IM or SC, your clinician’s instructions, your body size, and how confidently you can locate the landmarks.
What’s normal after a B12 injection?
Common, expected effects include mild soreness, slight redness, or a small bruise at the injection site for a short period. You should contact a clinician if you notice spreading redness, significant worsening pain, fever, or signs of an adverse reaction.
Conclusion
Knowing where to inject B12 and understanding how B12 injections are given can turn a stressful routine into a manageable, consistent part of your PA relief plan. The key takeaways are: use the route your prescription specifies, choose the correct injection site with accurate landmarks, rotate sites, and follow technique guidance for angle and depth.
Next step: Ask your clinician or nurse to watch your first injection (or do a quick check) and confirm your site selection and depth—then start rotating sites based on their instruction.
Discussion